
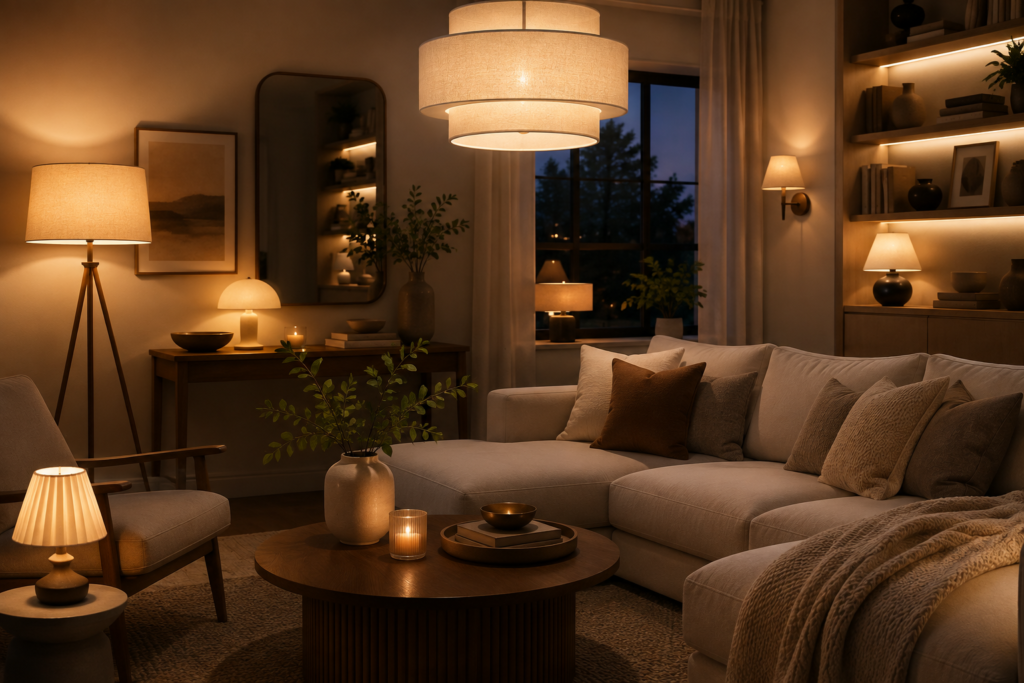
A beautiful room can have great furniture, carefully chosen colors, and stylish accessories—but if the lighting is wrong, the entire space can feel flat, harsh, or uncomfortable.
Interior designers know that great lighting is rarely about one impressive fixture. Instead, they create layers of light that work together to make a room functional during the day and warm and inviting at night.
The good news is that you don’t need to hire an interior designer to achieve the same effect.
By combining ambient, task, and accent lighting, you can transform an ordinary room into a space that feels more sophisticated, comfortable, and intentional.
In this guide, we’ll show you how to layer lighting step by step, where to place each type of light, which bulbs to choose, and which lighting mistakes to avoid.
What Is Layered Lighting?
Layered lighting means using several different sources of light to create a balanced and flexible room.
Instead of depending on one ceiling light, you combine three primary layers:
1. Ambient Lighting
Ambient lighting provides the room’s general illumination.
Examples include:
- Ceiling fixtures
- Chandeliers
- Pendant lights
- Recessed lighting
- Flush-mount fixtures
Think of ambient lighting as the foundation.
2. Task Lighting
Task lighting provides focused illumination for activities that require more visibility.
Examples include:
- Desk lamps
- Reading lamps
- Under-cabinet kitchen lights
- Vanity lights
- Bedside lamps
Task lighting makes everyday activities easier and more comfortable.
3. Accent Lighting
Accent lighting adds atmosphere and highlights specific features.
Examples include:
- Picture lights
- Wall sconces
- LED strip lighting
- Cabinet lighting
- Decorative table lamps
- Small spotlights
Accent lighting is what gives a room depth and personality.
Why Layered Lighting Makes a Room Look Better
Using multiple light sources allows you to control the atmosphere of a room throughout the day.
During the morning, you might rely heavily on natural light.
During the afternoon, you may need task lighting in specific areas.
In the evening, you can turn off the brighter ambient lighting and rely on warm lamps and accent lights to create a more relaxing atmosphere.
The result is a room that feels:
- More comfortable
- More functional
- More visually interesting
- Warmer
- More spacious
- More professionally designed
Step 1: Start With Natural Light
Before buying a single lamp, look at how natural light moves through the room.
Notice:
- Which windows receive the most sunlight?
- Which areas remain dark?
- Does sunlight change dramatically throughout the day?
- Are curtains blocking useful daylight?
Natural light should be considered the first layer of your lighting plan.
How to improve it:
- Keep windows as unobstructed as possible.
- Use lightweight curtains where appropriate.
- Avoid placing large furniture directly in front of windows.
- Use mirrors to reflect daylight.
- Choose lighter colors for dark rooms.
You don’t need to replace natural light with artificial lighting if you can maximize what you already have.
Step 2: Choose Your Main Ambient Light
Your ceiling fixture is usually the starting point.
However, don’t assume it needs to provide all the light in the room.
Choose a fixture that provides comfortable general illumination while allowing your other lights to do the rest.
Living room options:
- Flush-mount ceiling lights
- Semi-flush fixtures
- Chandeliers
- Pendant lights
- Recessed lighting
Bedroom options:
- Flush-mount fixtures
- Simple pendants
- Ceiling fans with integrated lighting
Dining area options:
- Pendant lights
- Chandeliers
- Linear fixtures
Design tip: Choose a fixture that complements the room rather than competing with it.
Step 3: Add Task Lighting Where You Need It
Now identify the activities that happen in each room.
Ask yourself:
Where do I read, work, cook, apply makeup, study, or perform detailed tasks?
These areas need focused lighting.
Living room:
Add a floor or table lamp beside a reading chair.
Home office:
Use a desk lamp positioned to reduce shadows.
Kitchen:
Install under-cabinet lighting over countertops.
Bedroom:
Place lamps on both sides of the bed if possible.
Bathroom:
Use appropriate vanity lighting around the mirror.
The goal is simple:
Put light where you actually need it.
Step 4: Add Accent Lighting
This is the layer that often makes the biggest visual difference.
Accent lighting draws attention to architectural features, artwork, shelves, plants, and decorative objects.
Consider illuminating:
- Artwork
- Bookcases
- Built-in shelves
- Plants
- Architectural details
- Display cabinets
- Wall textures
You don’t need many accent lights.
Even one carefully positioned light can create a beautiful focal point.
Step 5: Use Lamps at Different Heights
One of the easiest ways to make layered lighting look professionally designed is to vary the height of your light sources.
For example:
High: Ceiling fixture
Medium: Floor lamp
Low: Table lamp
Very low: Small accent or cabinet light
This creates visual depth and prevents the room from feeling illuminated from only one direction.
Try this living room combination:
- Ceiling fixture
- Floor lamp beside the sofa
- Table lamp on a side table
- Small accent light on a shelf
This simple arrangement can completely change the atmosphere of the room.
Step 6: Use Warm Light for Cozy Spaces
Color temperature has a major effect on how a room feels.
For bedrooms, living rooms, and relaxing spaces, warmer light generally creates a more comfortable atmosphere.
Look for warm-white bulbs rather than very cool, blue-toned lighting.
A simple guide:
Warm light: Cozy, relaxing, intimate
Neutral light: Balanced and practical
Cool light: Bright, energetic, task-oriented
For most cozy living spaces, a warm color temperature is a good starting point.
Step 7: Create a Cozy Living Room Lighting Plan
The living room is one of the best places to use layered lighting.
Instead of using only a ceiling fixture, create several lighting zones.
A simple living room formula:
1 ceiling light
1 floor lamp
1–2 table lamps
1 accent light
You can then turn individual lights on or off depending on what you’re doing.
For movie night:
Turn off the main light and keep only soft accent lighting.
For reading:
Use the floor lamp near your chair.
For entertaining:
Use several lamps together to create a warm atmosphere.
Step 8: Layer Lighting in the Bedroom
Bedrooms should feel relaxing rather than overly bright.
Start with soft ambient lighting and add focused bedside lighting.
Try:
- One ceiling fixture
- Two bedside lamps
- Optional wall sconces
- Soft accent lighting
Bedside lamps are particularly useful because they allow you to turn off the main light without leaving the bed.
Designer tip:
Matching bedside lamps create symmetry, while different lamps with similar proportions can create a more collected look.
Step 9: Don’t Forget the Kitchen
Kitchens require more functional lighting than many other rooms.
A single ceiling fixture often creates shadows underneath cabinets and over countertops.
Layer your kitchen lighting with:
Ambient lighting
Ceiling fixtures or recessed lights.
Task lighting
Under-cabinet lights above work surfaces.
Accent lighting
Lighting inside glass cabinets, underneath islands, or above open shelving.
This combination makes the kitchen more practical and more visually appealing.
Step 10: Use Under-Cabinet Lighting
Under-cabinet lighting is one of the most useful upgrades you can make in a kitchen.
It illuminates the countertop directly and reduces shadows created by overhead lighting.
It can also make the kitchen feel more sophisticated at night.
When choosing under-cabinet lighting, consider:
- Brightness
- Color temperature
- Installation method
- Cord management
- Dimming capability
- Smart controls
For renters, rechargeable or adhesive-mounted options can be especially convenient.
Step 11: Highlight Artwork and Decorative Features
Your favorite artwork deserves better than being lost in a dark corner.
Use accent lighting to draw attention to:
- Paintings
- Photography
- Sculptures
- Gallery walls
- Decorative shelves
Position the light carefully so it highlights the artwork without creating distracting glare.
This is a simple technique that can make an inexpensive piece of artwork look much more intentional.
Step 12: Use Mirrors to Multiply Light
Mirrors don’t create light, but they can help distribute it.
Position a mirror where it can reflect:
- A window
- A floor lamp
- A table lamp
- A decorative fixture
This can make the room feel brighter and visually larger.
Small-space trick:
Place a large mirror opposite or slightly beside a window to reflect natural daylight deeper into the room.
Step 13: Add Dimmers for More Control
A room doesn’t need the same brightness at 8 a.m. and 10 p.m.
Dimmers allow you to adjust the intensity of your lighting according to the time of day and activity.
For example:
Morning: Brighter
Afternoon: Moderate
Evening: Soft
Movie night: Very low
If your existing fixtures support dimming, this can be one of the most useful upgrades you make.
Step 14: Consider Smart Lighting
Smart bulbs and smart lighting systems can add another level of flexibility.
Depending on the product, you may be able to:
- Adjust brightness
- Change color temperature
- Create schedules
- Control lights from your phone
- Use voice commands
- Create lighting scenes
For example, you could create a “Relax” scene that turns the main lights down while keeping your floor and table lamps on.
Smart lighting is particularly useful when you want different atmospheres without constantly adjusting multiple switches.
Step 15: Balance the Room From Every Angle
Finally, walk around the room and look at it from different positions.
Is one corner much darker than the others?
Is the ceiling light too harsh?
Does the sofa area have enough light for reading?
Is there a dark wall that could benefit from an accent light?
Interior designers don’t simply illuminate the center of a room.
They create balanced pools of light throughout the space.
The Three-Layer Lighting Formula
If you’re a beginner, don’t overcomplicate things.
Start with this simple formula:
Ambient
Provides general illumination
↓
Task
Provides focused light for activities
↓
Accent
Adds atmosphere and highlights features
When these three layers work together, the room feels much more sophisticated.
Room-by-Room Lighting Guide
| Room | Ambient | Task | Accent |
|---|---|---|---|
| Living Room | Ceiling fixture | Floor/table lamp | Shelf or artwork light |
| Bedroom | Ceiling fixture | Bedside lamps | Wall or decorative light |
| Kitchen | Ceiling/recessed | Under-cabinet | Cabinet/shelf lighting |
| Dining Room | Pendant/chandelier | — | Decorative lighting |
| Home Office | Ceiling fixture | Desk lamp | Shelf or background light |
| Bathroom | Ceiling light | Vanity lighting | Mirror or decorative light |
| Entryway | Ceiling fixture | — | Wall light or mirror lighting |
Common Lighting Mistakes to Avoid
Using Only One Light Source
A single ceiling fixture often creates a flat and harsh atmosphere.
Better: Combine multiple light sources.
Choosing the Wrong Color Temperature
Very cool lighting can make a cozy room feel clinical.
Better: Choose a warmer tone for relaxing spaces.
Making Every Light Equally Bright
Not every light needs to compete for attention.
Better: Create different levels of brightness.
Ignoring Dark Corners
Dark corners can make an otherwise beautiful room feel unfinished.
Better: Add a floor lamp, table lamp, or subtle accent light.
Putting Lights at the Wrong Height
A lamp that’s too high or too low may not provide useful illumination.
Better: Consider what activity the light is supporting.
Overusing Recessed Lighting
Too many ceiling lights can make a room feel commercial rather than cozy.
Better: Balance overhead lighting with lamps and accent lights.
A Beginner’s Lighting Shopping Checklist
If you’re starting from scratch, you don’t need to buy everything at once.
Start with the essentials.
| Lighting Product | Best For | Priority |
| Floor lamp | Living room corners | High |
| Table lamp | Side tables & bedrooms | High |
| Warm LED bulbs | Everyday lighting | High |
| Under-cabinet lights | Kitchen counters | High |
| Pendant light | Dining areas | Medium |
| Wall sconces | Bedrooms & hallways | Medium |
| Picture light | Artwork | Medium |
| Smart bulbs | Flexible lighting | Optional |
| LED strip lights | Shelves & cabinets | Optional |
| Dimmer | Brightness control | High |
Frequently Asked Questions
What are the three layers of lighting?
The three main layers are ambient lighting, task lighting, and accent lighting. Ambient lighting illuminates the room generally, task lighting supports specific activities, and accent lighting adds atmosphere or highlights features.
How do I make my living room lighting look expensive?
Use several light sources at different heights rather than relying on one ceiling fixture. Combine a ceiling light with a floor lamp, table lamps, and subtle accent lighting.
What color temperature is best for a living room?
Warm-white lighting is generally a good choice for living rooms because it creates a comfortable and relaxing atmosphere.
Should all the lights in a room match?
Not necessarily. The fixtures should feel coordinated, but they don’t have to be identical. Mixing different shapes and materials can create a more sophisticated, layered look.
How many lamps should a living room have?
It depends on the size and layout of the room. A good starting point is one main ceiling fixture, one floor lamp, and one or two table lamps.
Is layered lighting expensive?
It doesn’t have to be. You can build layered lighting gradually using affordable table lamps, floor lamps, LED bulbs, and rechargeable accent lights.
Are smart bulbs worth it?
They can be useful if you want adjustable brightness, schedules, remote control, or different lighting scenes. However, they aren’t necessary for creating beautiful layered lighting.
Final Verdict
Great lighting is one of the easiest ways to make your home feel more comfortable and professionally designed.
The secret isn’t buying one expensive statement fixture.
It’s creating layers.
Start with ambient lighting, add task lighting where you need it, and then introduce accent lighting to create atmosphere and highlight the features you love.
From there, experiment with different heights, warm bulbs, dimmers, mirrors, and smart controls until you find a combination that works for your lifestyle.
And remember: you don’t have to transform the entire house at once.
Start with one room.
Add a floor lamp to a dark corner. Replace harsh bulbs with warmer ones. Add a table lamp beside the sofa. Install under-cabinet lighting in the kitchen.
Small changes can completely transform how your home feels.
The best lighting design is not the lighting you notice first—it is the lighting that makes the entire room feel better.